Data Migration Between Two Linux Hosts
flow chart Data migration a) preparing the hardware Put the host and the storage in the specified location; Connect power cable, network cable and fiber; Power
1. flow chart
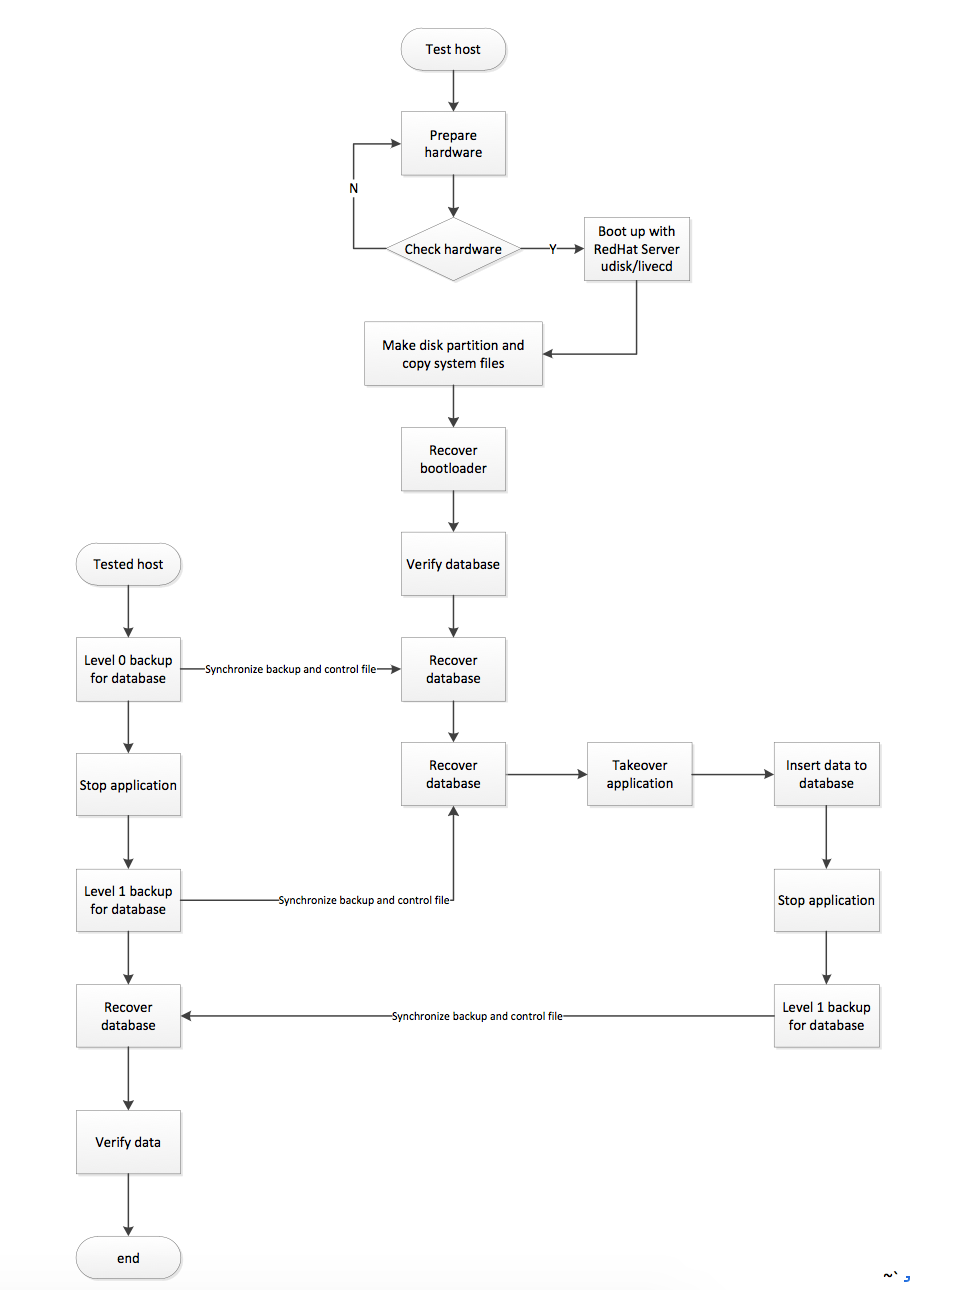
2. Data migration
a) preparing the hardware
- Put the host and the storage in the specified location;
- Connect power cable, network cable and fiber;
- Power on the machines and see if there is no exception;
- Boot to LSI (when the P400 RAID card is recognized, enter 'F8'), and configure RAID1 with two disks.
b) Boot up with Linux LiveCD
- Boot up with Red Hat Linux Server LiveCD (Desktop distributions did not contain the driver of the RAID CARD) and boot into 'rescue mode' with network and make the IP address '10.0.0.1/24' (connected to the source host with straight-though cable, and configure the network card with '10.0.0.4'). Choose 'Skip' when the screen displays the content that follows, to avoid errors when 'umount' runs on the root partition.
c) Preparing the disks
As the version of Linux in this case is not the latest, the disk still uses the 'MBR' partition format, so we will create the partitions with 'fdisk' tools.
# fdisk /dev/cciss/c0d0PS: Once on the command line, press 'p' to show the partition information, 'd' to delete a partition, 'n' to create a new partition (then 'p' stands for primary partition and 'e' for logical; use like '+50M/G' to limit the size or specify the last sector).
d) copy system files
format the partitions
# for I in 1 2 3 5 7; do mkfs.ext3 /dev/cciss/c0d0p$I; done
format swap partition
# mkswap /dev/cciss/c0d0p6
e) create mount point for local partitions
mkdir –p /system/boot
mkdir –p /system/opt
mkdir –p /system/home/oracle
# mkdir -p /system/oradata
# mkdir -p /system/proc
mkdir –p /system/dev
mkdir –p /system/sys
mkdir –p /system/run
PS: Do not mount the root partition to the '/mnt' directory, or you will get a lot of errors later.
f) Mount local partitions to their mount points
# mount /dev/cciss/c0d0p7 /system
# mount /dev/cciss/c0c0p1 /system/boot
mount /dev/cciss/c0d0p2 /system/home/oracle
mount /dev/cciss/c0d0p3 /system/opt
mount /dev/cciss/c0d0p5 /system/oradata
g) copy system files
# for I in `ls / | grep -v 'proc\|dev\|sys\|run\|oradata'`; do rsync –av –progress root@10.0.0.1:/$I /system
Explanation: Synchronize, while preserving permissions, all directories under the source host's root partition except "proc, dev, sys, run, oradata" to the /system directory on the target host, i.e., the local disk's root partition.
h) recover bootloader
mount run-time filesystem
# mount -t proc none /system/proc
# mount --rbind /dev /system/dev
# mount --rbind /sys /system/sys
# mount --rbind /run /system/run
change root partition to local disk
# chroot /system /bin/bash
install grub to local disk
# grub-install --no-floppy /dev/cciss/c0d0
fix 'grub.cfg' and '/etc/fstab'
If you did not specify the 'label' for each partition, then you need to change the line 'ro root=LABEL=/' in '/boot/grub/grub.cfg' to 'ro root=/dev/cciss/c0d0p7' (c0d0p* depends on your situation).
reboot to verify
# shutdown -r now
PS: because the size of the data in this case is much less than 146GB, the storage we prepared is not used.
3. Backup and recover the Oracle database
a) make level 0 RMAN backup for source host database
# su - oracle $ cd $ORACLE_HOME $ bin/rman target / RMAN> backup incremental level 0 database;
PS: level 1 backup is based on level 0, so we need to make a level 0 backup at the beginning.
b) copy the backup and the control file to target host
copy backup files through the network
# rsync -av --progress /opt/oracle/flash\_recovery\_area/backupset/ root@10.0.0.1: /opt/oracle/flash_recovery_area/backupsetPS: the first path ends with '/', so the files inside will be copied to the directory 'backupset' on the target host; otherwise the directory 'backupset' on the source host will be copied.
c) Copy the control file
# rsync -av --progress /home/oracle/c* root@10.0.0.1:/home/oracle
PS: for where the backup or control file is, please check the output of show all to confirm under the RMAN command line. Make sure the path on the source and target hosts are the same.
d) recover database with RMAN on target host
After shutting down the target host's Oracle database, restart the database instance.
SQL> shutdown immediate;

SQL> startup nomount;
Restore the control file
RMAN> retore controlfile from '/home/oracle/c-2198842942-20160819-02';Note: Use the actual control file name as appropriate.
Mount the control file
RMAN> alter database mount;Restore the database
RMAN> restore database;
RMAN> switch datafile all;
RMAN> recover database;
Verify database file consistency
SQL> select checkpoint\_change# from v$datafile;

SQL> select FILE#, CHECKPOINT\_CHANGE# from v$datafile\_header;
Note: The database is consistent only when the numbers from both queries match.
Open the database
RMAN> alter database open resetlogs;
4. Source Host Database RMAN Level 1 Backup
RMAN> backup incremental level 1 database;
评论Comments
加载中…Loading…
留下评论Leave a comment