HP P2000 Hard Drive Replacement and HP-UX LV Expansion
A client site has an HP P2000 G3 storage array that powered off abnormally due to a data center power outage. On powering it back on, 4 disk drives were found w
A client site has an HP P2000 G3 storage array that powered off abnormally due to a data center power outage. On powering it back on, 4 disk drives were found with fault lights lit simultaneously. By the time the case was received, more than half a month had already passed, and not only was the storage unable to access its data, but the host connected to it was also unable to use the database for unknown reasons. Investigation revealed several issues. The storage has 2 enclosures with 14 disks in total: 8 disks configured as RAID 5, the other 6 as RAID 6, with no global hot spare. When the fault occurred, two disks had failed in each RAID group — the RAID 5 was already in "offline" state, and the RAID 6 was in "degraded" state. On the host, /sybase holds the database, whose current usage is 100%. When connecting to the database, the error "status = JZ006" was reported. Excluding issues with the storage's own data, the Sybase connection failure is also related to having no space to write logs.
I. HP P2000 G3 Disk Replacement
Management port addresses: 10.0.0.2 (controller A), 10.0.0.3 (controller B), subnet mask 255.255.255.0, username manage, password !manage
The RAID 6 has 6 disks originally, with 2 having failed. After hot-swapping in the replacement disks, the system did not automatically add the new disks to the volume group; instead, they were marked as "AVAI" status, and you must manually add the disk to the corresponding volume group as a hot spare, after which the system will automatically sync the data. The specific operation is as follows:
In the left column, select the corresponding virtual disk → configuration → manage dedicated spare → check the needed disks (status is AVAI) → modify spares → done.
- The two failed disks in the RAID 5 show "LFTOVR" status in the management UI, and that volume group is already "offline", so you can try using the
trustcommand. The official documentation describes the use restrictions of this command in detail. The document says this command "should only be used as a last step in disaster recovery", "this command may cause permanent data loss, and the virtual disk may run unstably", "never use the trust command on a virtual disk whose only disk is in a reserved or failed state", and also states that "the trust command attempts to synchronize reserved disks so that all reserved disks become active members of the virtual disk again". Because the Vdisk in the case here is offline and more than one physical disk is involved, and the data in the volume group is not particularly important to the client, we tried the trust command.
# trust enable     // In some systems, this command is disabled
# show vdisk       // View the status of all virtual disks (RAID groups) in the system
# trust vdisk\*      // Trust the virtual disk (volume group) with reserved ("LFTOVR") disks
# show vdisk       // View vdisk status again
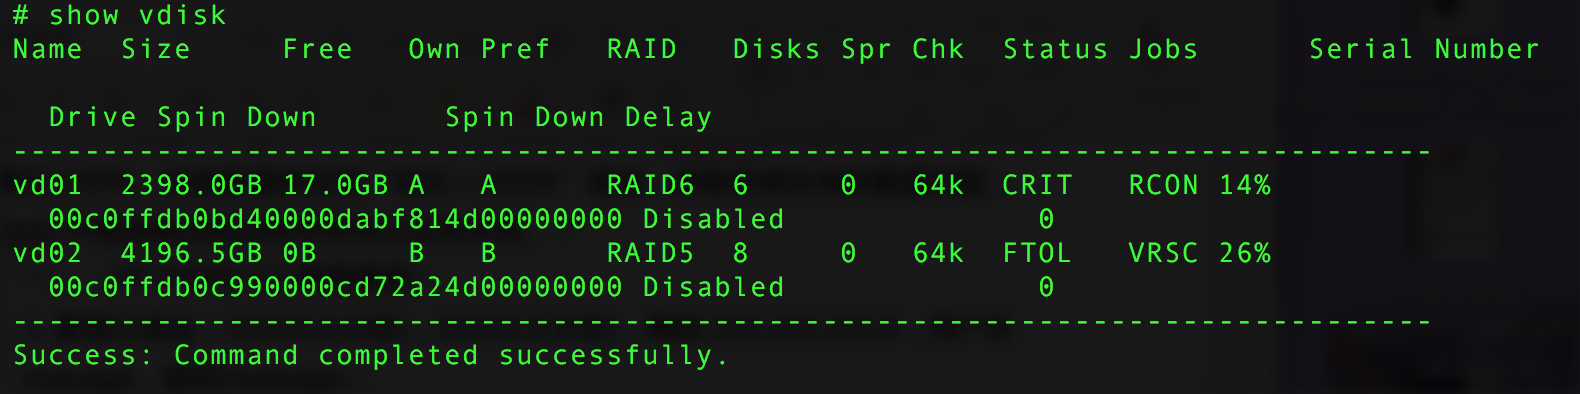
As shown in the figure, after executing the trust command on vd02, data sync has started. Checking the status of the two previous disks in the system, they have returned to normal.
As for why member disks become "reserved" (LFTOVR) state, the official explanation is as follows:
- a) Before the controller polls the drives, the drives have not yet finished accelerating. When the controller queries the drives and finds they are not in the ready state, it will place the drives in a "reserved" state.
- b) Incorrect power-on sequence.
- c) Firmware upgrade (due to timing issues).
- d) Failover takes longer than expected.
- e) Drives swapped from other MSA systems, or removed and re-inserted in the array.
The vendor also warns that a volume group activated via the trust command has zero tolerance for any other failures and must not be put back into a production environment. The data on the trusted virtual disk must therefore be backed up, and the virtual disk must be deleted and rebuilt.
- Add a hot spare disk
P2000 G3 Experiment → provisioning → manage global spares → select the required disk → modify spares → done.
II. Extending an HP-UX File System
- Check whether online extension is possible
swlist | grep –I vxfs
If only Base-VXFS appears, the file system must be umounted before extending. If OnlineJfs is present, online extension is possible without umount.
- Unmount the file system
Because /sybase has a database installed and the database cannot be connected to, the database cannot be shut down normally. The only option is to find which process is using the /sybase directory and kill it.
fuse –cu /sybase
kill -9 12345 //Replace 12345 with the actual pid
umount /sybase
- Extend the volume group
mount //Check which vg and lv /sybase is mounted on. In this article it is /dev/vg00/sybaselv, with a size of 20GB. The bdf command also works.
vgdisplay –v vg00 //Check how much free space is left in the vg. In the example, the two local disks still have more than 800 PEs free; each PE is 32M, so roughly 25GB of free space remains.
lvextend –L 30000 /dev/vg00/sybaselv //Extend the logical volume to 30GB
lvextend –L 100000 /dev/vg00/sybaselv //Add 10GB
lvextend –l 1000 /dev/vg00/sybaselv //Extend to 1000 PEs
extendfs /dev/vg00/sybaselv
By the way, if the onlineJFS product is installed:
fsadm –F vxfs –b 30000 /sybase //Not tested
III. Sybase Database Start and Stop Commands
- Check the servername
cat $SYBASE/interfaces //That is /sybase/interface in this article 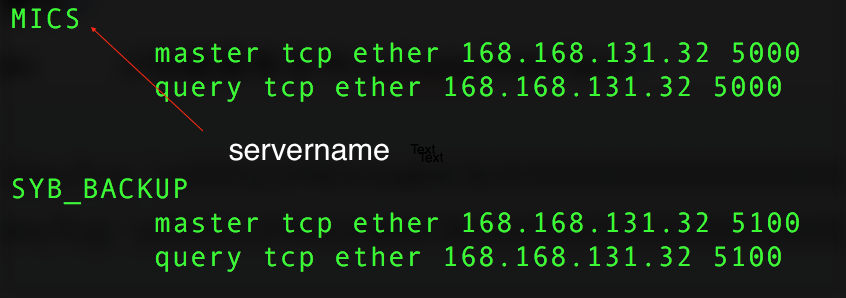
- Start the database
startserver –f RUN_MICS //Format: RUN_
If a "RUN_MICS file not found" message is shown, you can either enter the absolute path or cd to the $SYBASE/SYBASE_ASE/install directory before running it.
- Stop the database
isql –Usa –P123456 –Sservername //Change 123456 to the sa password, and change servername to the value shown in the figure above
- shutdown MICS
- go //You must run
goafter typing the command for it to take effect - reset //If you mistype a command, you can use
reset
评论Comments
加载中…Loading…
留下评论Leave a comment